
Leveraging Best-Selling Product Stands in Retail
A Guide to Boost Sales Using Your POS System and Strategic Placement
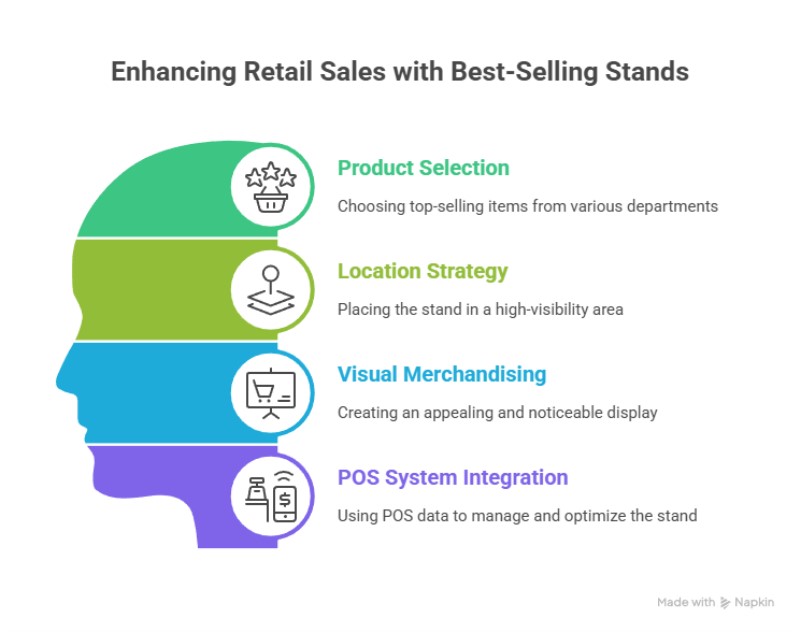
A best-selling product stand is a dedicated retail display that highlights your shop's most popular items. It should be placed in an eye-catching spot. Unlike regular shelving that organizes products by category, a best-selling stand gathers your top performers from various departments based on proven sales. Here we'll show you how to leverage a key tool you already own, your Point of Sale (POS) system, to create a best-selling product stand.
Think of it as your shop's "greatest hits" collection. Just like the old music shop, when you came in, we saw a sign of the top 40 songs. Your best-selling stand features your most popular products; it works regardless of what you sell, such as magazines, pet food, greeting cards, or accessories.
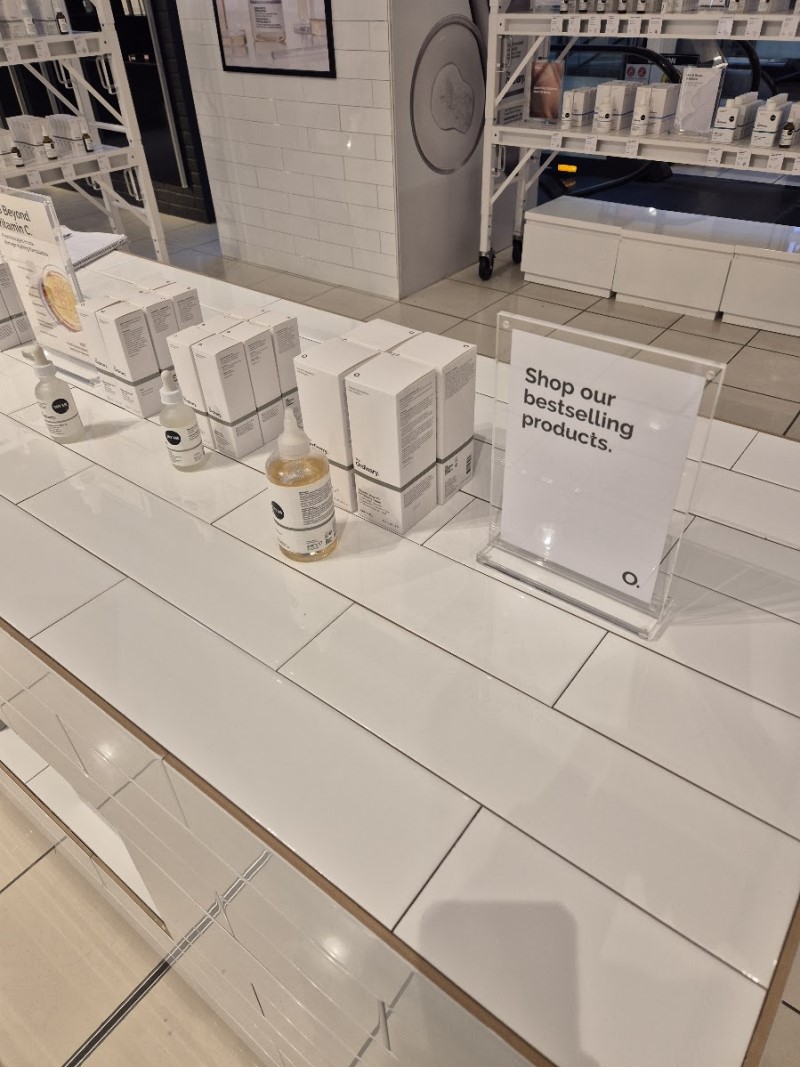
Many large retailers use it. Here is a picture I took of it being used in a large department store, Myers. See how Myers uses such stands to increase sales.
The concept is deceptively simple: take the items your customers already buy and make them impossible for other customers to miss. When executed correctly, this simple idea becomes a powerful sales tool in your shop, combining merchandising strategy, customer psychology, and sales data insights to drive sales growth.
Here I will explain exactly how to set up an effective product stand in your shop, step by step, by using your POS system to keep displays profitable and dynamic.
The Psychology Behind Best-Selling Product Stands
At its core, a best-selling product gives social proof. Shoppers don't just see products; they know what others have chosen and trusted. This is social proof, and customers love it.
Generally, shops use signs like "Best Seller" or "Customer Favourite".
Products labelled as "popular" or "best-selling" sell significantly more than unlabeled ones, potentially adding thousands of dollars in sales without extra marketing.
Applying this in practice: Use simple, bold signs with phrases like "Best Seller" at eye level so they're easily seen.
Choosing the Optimal Location
Location is the key to any display's success. Even the most attractive stand will be ignored if placed poorly. I recommend focusing on two prime locations that deliver the highest returns:
The Checkout Counter Zone
Position your best-selling stand within arm's reach of waiting customers, in this prime impulse buy area where they are ready to spend and have time to browse.
Why it works so well: Customers in checkout lines have already made the mental commitment to purchase. They're in a buying mindset, their wallets are out, and adding one more item feels natural rather than like a separate purchase decision.
Such checkout displays increase average transaction values when properly positioned.
Best practices for checkout placement: Focus on small, light items. Ensure displays don't block the flow or cause crowding. Place at natural hand-reach height (90-120cm) for easy access.
The significant issue here is that if they are not queuing up, they do not see it; however, this only applies to impulsive goods. Therefore, my choice would be the entrance.
The Entrance Decompression Zone (My Top Recommendation)
Position your stand 2-3 metres inside the entrance where customers naturally slow down and adjust to your store environment. We call this the "decompression zone", and it is where shoppers go from the outside world into your shop.
Why this location works: Customers entering your shop are forming first impressions and are highly receptive to new information. A well-positioned stand here immediately signals that your shop is organised, customer-focused, and features popular items.
Strategic placement tips:
- Place it where your customers tend to walk around your shop, generally on the left side.
- Avoid blocking the entrance flow—customers should walk around it comfortably.
- Have good lighting so people will see it.
- Keep the display height modest.
Think of your stand as an "interruption point" that turns casual browsing into a buying opportunity, and both the checkout and entrance zones naturally create these positive interruptions.
How to Use POS Data to Select Products for Your Display
Your POS system is an invaluable guide to selecting products that sell. Grounding your choices in real sales data ensures relevance and profitability.
Running Essential Reports
Top-Selling Items Report: Generate a 30-90 day report showing your highest-volume products.
Cross-Sell Analysis: Run your companion sales reports to identify products that are frequently purchased together. For example, if coffee pods appear with specialty biscuits in 40% of transactions, add coffee pods to the display.
Seasonal Performance Data: Review 12-month historical data to spot seasonal patterns. Run your top-selling report for the same period last year to get specific ideas for what sold well this time of year. For example, if you're planning your display for September, look at the top-sellers report for September of last year to see which products were popular then; this gives you concrete, proven items that sold in your shop at that time.
Top-Selling Reports by Quantity and Profit: Run your top-selling report sorted both by quantity sold and by total profit. Both KPIs are essential for different reasons. High-quantity sales reveal what customers are willing to buy. Often, if they buy something, this leads them to additional purchases. However, the reality is that we need high-profit items to generate a profit. Your top-selling report does this already.
Product Selection Strategy
Balanced Product Mix: On your stand have no more than three product departments. Too many and you overwhelm them. If you need to showcase more items, create specialized stands in other areas. Within each category, offer a maximum of 3-5 specific items.
Price Point Distribution:
- Eye level: High-margin or strategic items
- Hand level: Mid-range impulse items
- Lower level: Value items or bulk packages
The 70-20-10 Rule: I have seen this rule of thumb: 70% proven best-sellers, 20% emerging, trending items, and 10% seasonal or promotional products. In practice, this balance ensures consistent sales while testing new opportunities.
Using POS for Ongoing Management
Weekly Performance Reviews: Every week, check which display items sold and which didn't on the stand. Replace your slow-selling items; your POS reports will instantly show this data.
Inventory Level Monitoring: Ensure that your stand has sufficient stock. Nothing kills sales momentum like empty spaces when a stock item runs out.
Display Types & Visual Merchandising Tips
Core Display Types
Pyramid Display: Although it is great for selling, for a best-selling stand where we do not have a central focal point for an item but many items, I am reluctant to suggest it here. It works well if you have sales stars.
Grid Display: I suggest using this display, as it features neat rows and columns that create a clean, organised look for easy browsing. It is perfect for books, magazines, or packaged goods if they have similar sizes. Maintain consistent spacing, say 15cm between items.
Stacked Rows: Horizontal layers are ideal for items that require frontal views, such as greeting cards. Face all products for maximum impact.
Cluster Display: Groups complementary products together, promoting bundle sales. Arrange related items in triangular groupings of 3 to 5 items.
Critical Visual Elements
Front-Facing Layout: Always display products with their front facing forward for clear visibility—train staff to "face up" the display during quiet periods throughout the day.
Lighting: Lighting will enhance the visual appeal of products. If customers can't see it clearly, they won't buy.
Signage That Sells: Use clear signs, I like "Best Seller." Size signs: 10cm x 15cm minimum for visibility. Place at eye level, not above products where they get lost.
Maintain Cleanliness: Clean, uncluttered stands improve shopper focus and perception. Dust and straighten products regularly. A messy display is fine for bargain shoppers, but not for quality items like here.
Maintaining Freshness Through Weekly Rotation
Stale displays lose their power within 2-3 weeks as regular customers become blind to them. Refresh your stand weekly. Aim to change 20-30% of items weekly.
Seasonal Alignment: Rotate to match upcoming events:
- January: Back-to-school, New Year health products
- March: Autumn fashion, Easter items
- June: Winter warmers, Father's Day gifts
- September: Spring cleaning, Mother's Day prep
- December: Summer holidays, Christmas gifts
Leveraging Your POS System for Maximum Impact
Your POS system extends beyond sales tracking to become your display management command centre.
Final Thoughts & Call to Action
Start today with this proven 3-step process:
- Analyse your POS data - Pull your top-sellers report and identify 6-9 products that combine strong sales with healthy margins
- Choose the correct location - Position your stand either near your checkout counter for maximum impulse buying or in the entrance decompression zone for a lasting first impression.
- Set up weekly rotation - Schedule a weekly review. You need to keep the display fresh.
Boost your shop's sales and customer loyalty with an expertly crafted best-selling product stand. It is a simple yet powerful merchandising tool.
Let me know what the top-selling product is that you'll feature on your stand?
Written by:

Bernard Zimmermann is the founding director of POS Solutions, with 45 years of experience, now retired and consulting businesses to optimise operations and enhance customer experiences through POS technology.