
A speed bump is a physical disruption in the road that slows you down. You pay attention. Shift from "autopilot" to "alert." In retail, a speed bump slows down customers, too. A retail speed bump is a strategically placed display located in your storefront. Its job isn't necessarily to sell the product it holds (though that's a nice bonus); its primary job is to physically and visually interrupt the customer's walk. It gets them to break their stride, lowers their gaze, and switches their brain from "walking past" to "browsing."
Without a speed bump, many customers will walk straight past your aisles, eyes glazed over, heading for a specific destination or simply drifting through without engaging. By placing a curated "obstacle" in their path, you force a pause. If they do not stop, they will not buy. It is that simple.
Here is how you can build a speed bump that stops traffic.
Why It Works: The 427% Discovery
Here is a study by the Russell R. Mueller Retail Hardware Research Foundation that found that in hardware stores, dump bins (a classic form of speed bump) increased sales of the items inside by a staggering 427%. However, the principle remains true across all retail sectors: Interruption creates sales.
Now, before you run out and buy a wire cage for your boutique, let's pause.
That 427% figure comes from the hardware industry, where "rummaging" is part of the experience. If you run a high-end store, e.g., a gift shop, a wire-dump bin might signal "cheap" rather than "value." So what retailers do often is not "dump bins." We bought "Discovery Tables." The psychological trigger is the same.
When done right, this display:
- Disrupts Autopilot: It physically and visually halts traffic.
- Lowers Risk: It usually features lower-priced items, making the mental barrier to entry much lower than a full-priced rack.
- Initiates the "Yes": Once a customer says "yes" to picking up a small item, they are psychologically primed to say "yes" to entering the store and buying more.
Step 1: The "What" – Don't Guess, Use Your POS Data
This is where most retailers get it wrong. They treat their speed bump display as a place to put "whatever we have too much of."
This is a mistake. Your speed bump is prime real estate. It is the billboard for your business. If you fill it with junk that nobody wants, you are telling everyone that your store is full of junk.
Instead of guessing, you need to turn to your POS system. Your point-of-sale software is not just for taking payments; it is a goldmine of intelligence.
POS reports
You are looking for specific criteria:
- Dead Stock: Items that haven't sold in 90 to 120 days. These are costing you money in storage and cash flow.
- High Margin: Items where you have enough markup that you can afford to discount them slightly if needed, or bundle them.
- Impulse Friendly: Items that don't require sizing or complex explanations. A scarf is a great speed bump item.
Another strategy is to use your POS system to find high-volume, low-cost items. Look at your "Best Sellers by Quantity" report. If you have a $15 candle that sells like hotcakes, that is a perfect candidate for a speed bump. Why? Because it is a proven winner. Putting it front and centre shows new customers that you stock desirable, affordable items. It acts as "social proof" that your store is worth entering.
Action Step: Before you move a single table, print out your "Slow Movers" report from your POS. Highlight the top 5 small, visually appealing, non-perishable items. These are your speed bump candidates.
Step 2: The Boutique Approach – Anatomy of a Perfect Display
Now that your POS system has told you what to sell, let's talk about how to sell it.
We want to create a "boutique discovery" zone, not a bargain basement.
The Fixture
Ditch the wire bin. Use a fixture that matches your store's vibe:
- The Nesting Table: A small, waist-high wooden table is inviting. It creates a flat surface that is easy to shop from.
- Vintage Crates: Stacking sturdy wooden crates creates a rustic, market-feel that implies freshness and discovery.
- The "Tower": A tiered stand works well for smaller items, allowing you to create height without taking up much floor space.
The Arrangement: The Pyramid Principle
Don't just lay items flat. Flat is boring. You need height and depth.
- Build Up: Use acrylic risers, books, or small boxes under a tablecloth to create different levels on your table.
- The Pyramid: Arrange products in a pyramid shape. The tallest item goes in the centre or back, with smaller items cascading down. This keeps the eye moving.
- Mass Up: Abundance sells. A table with three items looks picked over. A table with 30 items looks like a fresh shipment. If you don't have enough stock (which your inventory management software would warn you about), use smaller baskets to keep the items looking plentiful.
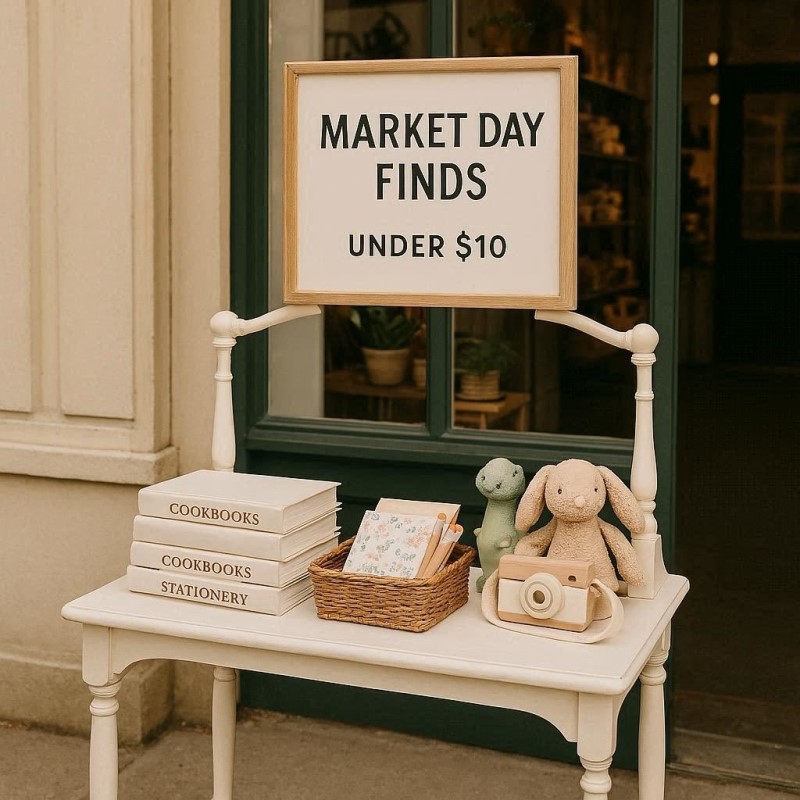
The Signage
Your sign is the "headline" of the story. A neon "SALE" sign can look desperate. Instead, use language that implies value and discovery.
- Bad: "50% Off Old Stock"
- Bad: "Clearance bin"
- Good: "Market Day Finds: Under $10"
- Good: "Last Chance"
- Good: "Staff Favourites"
Use a small A4 frame or a clean chalkboard. Ensure the price is clearly visible. If they cannot find the price, you've lost 50% of the walkers.
Step 3: Pricing Strategy
You have arrested their attention. You have shown them a nice product. Now, you need to trigger the impulse buy.
Decision fatigue is real. If a customer has to do mental maths ("It's $25 less 30%... uh..."), they will keep walking. Your speed bump pricing must be instant and frictionless.
- The "Power of One": A single, flat price point is most effective. "Everything on this table is under $15."
- The Bundle: "2 for $30." This encourages them to dig for a second item, doubling their dwell time at the table.
- The Anchor: Place a sign that says "Was $45, Now $20." This anchors the value at $45, making the $20 price tag feel like a win.
Step 4: Measuring Impact and Improving
You can't manage what you don't measure. This is where your Point of Sale (POS) system becomes your most valuable employee.
Many retailers set up a display and "feel" like it's working. But feelings don't pay the rent. You need complex numbers.
Tracking Conversion
- Mark the Date: Note exactly when you set up the speed bump in your calendar.
- Monitor Velocity: After 1 week, pull a sales report for the specific SKUs listed in the table. Compare the sales velocity (units sold per day) from the week before they were on the table to the week during.
- Check Basket Size: This is the advanced move. Use your POS reporting to see if the customers who bought the speed bump item also bought other items.
- If they only bought the $10 item, your speed bump is working as a sale but not as a funnel. You should move the table slightly closer to the door to pull them in.
- If they bought the $10 item plus a $50 shirt: Success! The speed bump did its job of arresting the walker and converting them into a high-value customer.
Rotate or Die
A stale speed bump is worse than no speed bump. If a local walks past your shop every morning and sees the same sun-faded books for three weeks, they will stop looking.
Use your POS system to set a reminder. Rotate the stock every 7 to 14 days. Even if the stock hasn't sold out, move it back inside and bring out something fresh. The change itself catches the eye.
Common Pitfalls to Avoid
As you rush to drag a table out to the footpath, keep these warnings in mind:
- The Weather: Australian weather is unpredictable. If you are on a high street, ensure your display is waterproof or easy to bring in quickly in case of sudden rain.
- The "Blocking" Effect: Ensure your speed bump doesn't physically block the entrance. It should be to the side of the flow, not a barricade.
- Brand Confusion: If you sell luxury linen, don't put a bin of cheap plastic toys out front to get attention. It confuses the customer about what you actually sell.
Conclusion
The battle for the modern shopper is won in seconds. We live in a distracted, fast-paced world where "autopilot" is the default setting.
A well-executed retail speed bump is your tool to break that autopilot. It is a friendly interruption that says, "Hey, take a breath. Look at this beautiful thing. Come inside."
But remember, a pretty table isn't enough. Data must support it.
- Use your POS system to identify the right stock.
- Apply visual merchandising principles to present it attractively.
- Use your POS reporting to monitor the results and refine your strategy.
Don't let another potential customer pass by unnoticed. This week, log in to your POS, identify five suitable items, and create your first speed bump. You might find that your best sales days begin on the footpath.
Written by:

Bernard Zimmermann is the founding director of POS Solutions, a leading point-of-sale system company with 45 years of industry experience, now retired and seeking new opportunities. He consults with various organisations, from small businesses to large retailers and government institutions. Bernard is passionate about helping companies optimise their operations through innovative POS technology and enabling seamless customer experiences through effective software solutions.